
Without a doubt, invisible zippers give a much cleaner and more professional finish to garments - particularly for side and back openings on all types of garments. Because they are a very different application to your standard zipper, they may take a while to master. But with the right machine foot and a little practice, it's really quite simple. After changing over to my Bernina sewing machine, my other favourite machine foot is Foot #35!
There are many helpful online tutorials that show you how to insert an invisible zipper, but here's a tutorial written to explain invisible zipper insertion on a curved hip. This post is timed to coincide with the release of our next pattern, The Chloe Pant (due out THIS week), which has a side zipper opening.
With all sewing techniques, the more you practise and trial techniques the better your sewing skills become. Thanks to Bernadette, I've learnt a new* method for inserting invisible zippers that has worked consistently well for me, so I thought I'd share it with you.
Note: For the purpose of
instruction, contrast stitching, zipper and vilene have been used. Of
course, it looks even better in matching thread and notions!
What you'll need:
Your Pant (of course!)
Invisible Zipper
Invisible Zipper Foot
Standard Zipper foot
Pins
Thread
Scissors
Chalk Marker
Tear-Away Vilene or Interfacing

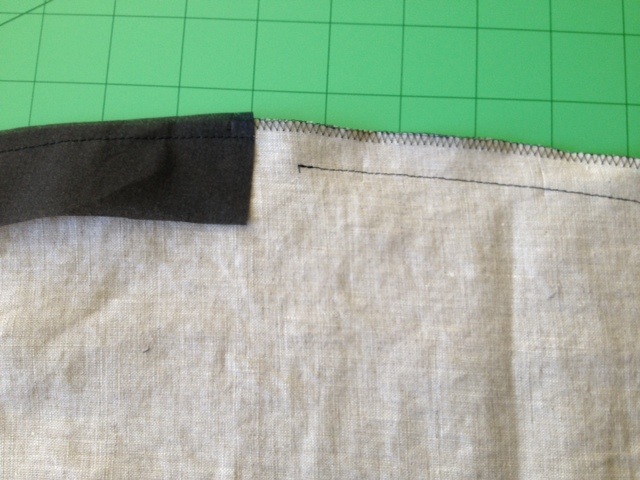
For side zippers on pants, it's recommended to reinforce the curved
hip area (from waist to just below zipper notch) with strips of interfacing approx
¾” wide or cut tear-away vilene shields (as shown above). Sew these shields on the wrong side of side seam.
For left leg with side zipper : Pin right sides together of side leg and
start to sew approx 1”-2” down from zipper notch down to hem (leaving the top
open to insert your zipper).

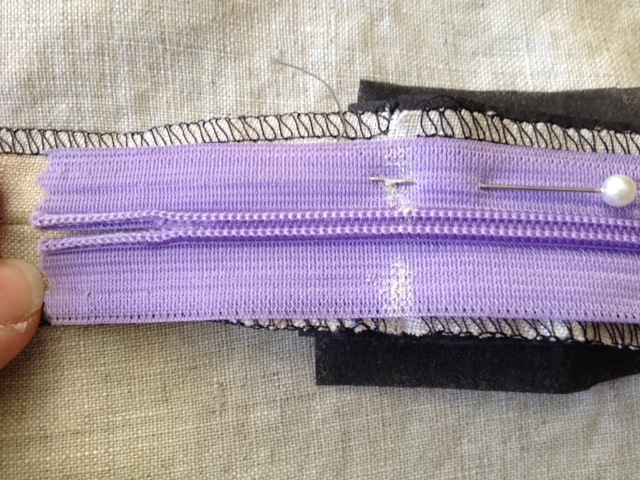
Press seams open. Insert a 20cm invisible zipper at the top of the pant where your opening is.

Make sure that the top of
your invisible zip (i.e. the plastic tip at the top of the zipper) sits just
past the ¼“ seam allowance at the waist. Pin in place, making sure that the
fabric is sitting right side up, facing you with the seam open. The zipper must
be face down on the fabric. Make sure to line up the
zipper coil edge with the seam allowance crease. Place pins parallel to the
zipper teeth. Note: the zipper tape
is always narrower than the seam
allowance.


Line up other side of zipper tape face down onto right side of fabric with seam open. Again, pin parallel to zipper teeth, lining up the zipper coil edge with the pressed back seam allowance crease. However, this time pin in the other direction. Note: pin towards the bottom of the zipper. Check before sewing that both the waistline and top of your zip line up evenly.


Start sewing at chalk mark (from where you finished sewing on other side) making sure to catch zipper coil into the groove under the foot and lining up zipper coil edge on seam allowance crease. Stitch down zipper, finishing with a back-stitch at the waist.

Once the zipper is securely in place, pull the zipper closed and press lightly on right side.

Remove your invisible zipper foot and attach your regular zipper foot

To close the small opening
left at the bottom of your zip and at the start of your side seam...

...join the right sides of your seam allowances together and pin
the opening. Make sure that the zipper tail is out of the way.

Starting approximately ¼” above where your zipper stitch
ends, sew up the opening making sure to back-stitch at top and bottom.

Tear away your Vilene
shields at the zipper opening et voila, your side invisible zipper is done!

Note: *This method of inserting an invisible zip is different to the common method. I find I get a better result this way. Give it a try and see how you go!
Thank you! I've been having trouble getting the bottom of the zipper allowance to stay invisible so I shall try this way out :D
ReplyDeletegreat tutorial- thanks!
ReplyDeleteI would love to see a real close up photo showing where the stitching line is in relation to the zipper coil... I have trouble getting close enough (obviously not using the Bernina foot the right way) and can see a bit of the zipper on the outside. thanks!
ok Liz will take a photo. But if you have the Bernina #35 foot, your coil should be positioned under the groove so that it turns the col out of the way and stitches directly behind.
DeleteHello, Thats very easy . When you say tear away the interfacing , is there any interfacing left at all ? Do you take it off on both sides of the stitching line ?
ReplyDeleteHi Mem, yes I remove the tear away on both sides of stitching line, if you've torn off from one side the other side of shield will come away easily.
DeleteThanks for your grateful informations, this blogs will be really help for Zipper tutorial.
ReplyDeleteGreat tutorial - thank you
ReplyDeleteDid you iron the zipper flat or is it really not necessary?
Hi Katie, here I didn't iron the zipper flat.
ReplyDeleteBut you can if you want to, other tutorials advise it. It helps with the top of the zipper when you start sewing.
thanks for the tutorial - I always avoid zippers in side seams of skirts and pants because they always ripple so I shall definitely try this method next time. I don't have an invisible sewing foot but seem to get a pretty good finish without one using a regular zipper foot after many years of practice
ReplyDeleteGood tutorial! I make it in make method but i have found some problems when i arrived to coursor
ReplyDeleteWould you recommend this in the side of a chiffon skirt - I've had nightmares with rippling before!
ReplyDeleteHi Debbie,
DeleteChiffons a hard one, if your skirt is flared and on the bias it's best to sew gently easing the fabric when sewing. It's also very important to be cut correctly on grain. And preferably no side zip on a chiffon skirt, I opt for an elactisized waist with chiffon.
The vilene shield on chiffon may be too much, not sure but anythings worth a try!
Hi guys, If its any help, I find it best to put the invisible zipper into the under layer of chiffon dresses and then hand catch the chiffon opening so that it can fall more softly.
ReplyDeleteRef chiffon, I have had some success with putting invisible zipper into under layer of garment and then hand catching the chiffon layer to it afterwards, so it falls softer.
ReplyDelete